I would like to share my basic, low cost and straightforward diy scanner.
Fist of all, my goal was to get novels in a digital format to be read with a ebook reader. I did not try to scan comics, old books where precision is a must or books with many graphics where distortion plays a key role. Thus, I wanted something simple because my diy skills are quite poor.
I also did not want to spend much money, so I wanted to maximize the hardware I have, basically a canon ixus 55 and a dinning room lamp.
I took the ideas from this forum and the instructable Daniel made based on strap cardboard boxes.
I have done many trials to improve it based on many suggestions I took from the forum, but many did not work for my model so my design is a balance of efficiency and complexity that is flexible enough to get good results either on most of the novels. There is only on exception which is pocket paperback prints, as margins usually are small, size of characters is small and print quality is poorer so ocr process gives more errors. I am going to use this scanner only for hardback editions or good enough paperback prints.
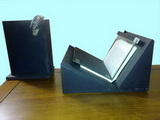
Here you have my humble and homemade but efficient design.
There is a bit of american tape to fix a movable part of the scanner (to be adapted to the thickness of the book) but I think I will remove it and fix this module since it does not give me better results.
The “hard ingredients†list is:
1 cm thickness wood piece.
1 black colour spray paint
1 solid tripod
1 Canon camera (mine was ixus 55 but an 8 mp model should be better)
Glue and steel points
Methacrylate or glass 4-5 mm thickness plates welded at 90º
Black piece of paper to avoid reflections
1 lamp
1 low consumption 27 W cold light bulb
A latex glove
American tape
The “soft ingredients†list:
CHDK firmware for canon cameras with “Ultra intervalometer†or similar script installed
Total commander or any good file renamer software
Scan Tailor
Abby Fine Reader 10
The process I follow:
Initial settlement and adjustments:
- Camera configured with black and white, superfine quality and large size; CHDK firmware installed and intervalometer running. No zoom.
- Place the camera on the tripod with the face of the camera parallel to the face of the book. Put the camera as close as possible to the book and check the whole page of the book fits at the visor with some room left, and edges of the book are parallel to edges of the camera visor. Check this for the first and the last page of the book, when book is thick and big, this can be tricky.
Once everything is settled, photograph odd pages first (stopless with intervalometer lapse time set on 7-8 seconds) and even pages. Usage of latex glove will avoid sticky paging. Avoid movement of the book and move only pages, if the book moves, correct it to its original position.
Bulk rotate pages to left and right (left button of Windows 7 with all files selected) depending on odd or even.
Bulk rename files coincident with book numbers in order to check no page has been either skipped or duplicated.
Scan Tailor all the files. Check manually content area is correct.
Abby Fine Reader the tiff files from scan tailor.
Check manually errors and problems.
Get a PDF file.
To get a word file requires more postprocessing since translation from pdf to word is not perfect and requires many manual adjustments. For my ebook reader a pdf file is enough.
I want to thank you all people who has contributed to this web, because their work and effort has been very useful to me.
If anyone is interested in particular details, just let me know.
Low cost book scanning for Dummies
Moderator: peterZ
- daniel_reetz
- Posts: 2812
- Joined: 03 Jun 2009, 13:56
- E-book readers owned: Used to have a PRS-500
- Number of books owned: 600
- Country: United States
- Contact:
Re: Low cost book scanning for Dummies
I don't know how I missed commenting on your build, JJJM, but this is excellent work. Congrats! I particularly like the cradle design. Have you had any problems with the pages "slumping"?
Re: Low cost book scanning for Dummies
Hello, sorry I did not reply but i have been off for a while. I had no problems with slumping at all. I have done a few improvements on the design, specially avoiding tripod and making a more solid base for the camera.
Regards
Regards
- Moonboy242
- Posts: 56
- Joined: 22 Aug 2010, 18:09
- E-book readers owned: iPad, Netbook
- Number of books owned: 1000
Re: Low cost book scanning for Dummies
JJJM, could you post your Ultra Intervalometer script? I'm having difficulty getting my settings right for 7 to 8 seconds as you've recommended.
Thanks.
Thanks.
iPad: Over it. Android FTW.
Re: Low cost book scanning for Dummies
Let me know if you have any problem.
Regards.
rem Author - Keoeeit
rem Upgraded by Mika Tanninen
@title Ultra Intervalometer
@param a Delay 1st Shot (Mins)
@default a 0
@param b Delay 1st Shot (Secs)
@default b 0
@param c Number of Shots (0 inf)
@default c 0
@param d Interval (Minutes)
@default d 0
@param e Interval (Seconds)
@default e 10
@param f Interval (10th Seconds)
@default f 0
n=0
t=(d*600+e*10+f)*100
if c<1 then let c=0
if t<100 then let t=100
g=(a*60)+b
if g<=0 then goto "interval"
for m=1 to g
print "Intvl Begins:", (g-m)/60; "min", (g-m)%60; "sec"
sleep 930
next m
:interval
n=n+1
if c=0 then print "Shot", n else print "Shot", n, "of", c
click "shoot_full"
if n=c then end
sleep t
goto "interval"
Re: Low cost book scanning for Dummies
By the way, I realized I never post my update of scanner. I made some improvements to have a more solid built with less manual adjustments for the camera.
Camera is canon a480 (75 eur) + power adaptor (4 eur) at ebay.
Since my goal is to get ebooks for electronic readers, my experience is snapping pictures is very low time consuming compared to postprocessing. I did not see much improvement having a better scanner and preferred to spend time on postprocessing phase (my poor diy skills had much to do also).
I think it is more efficient for me, to get a very good postprocessing workflow, mainly based on an expert knowledge of ScanTailor, Finereader and macros for Word. Book after book, I have been improving workflow to get faster and better results.